This post may contain affiliate links.
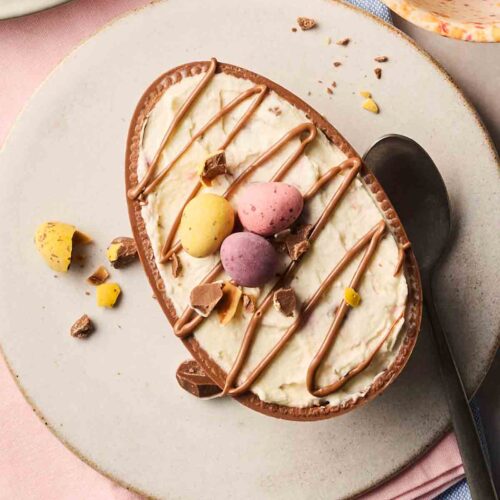
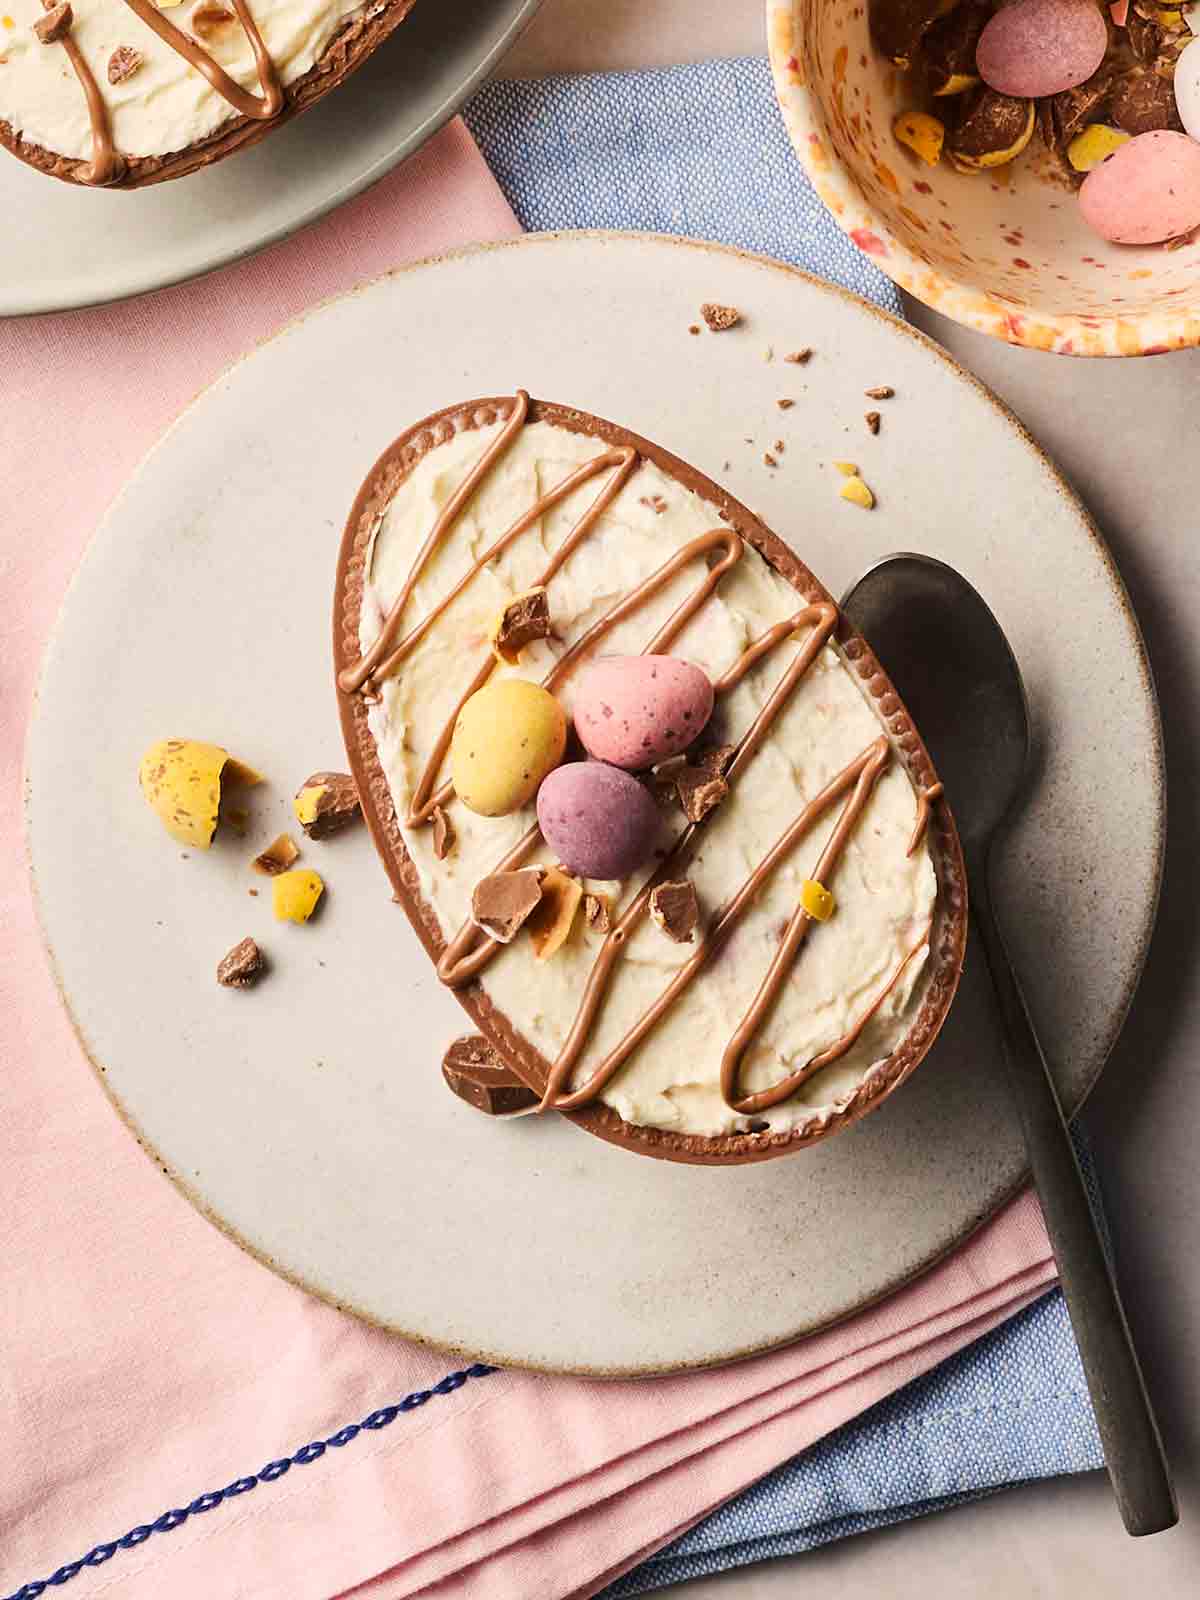
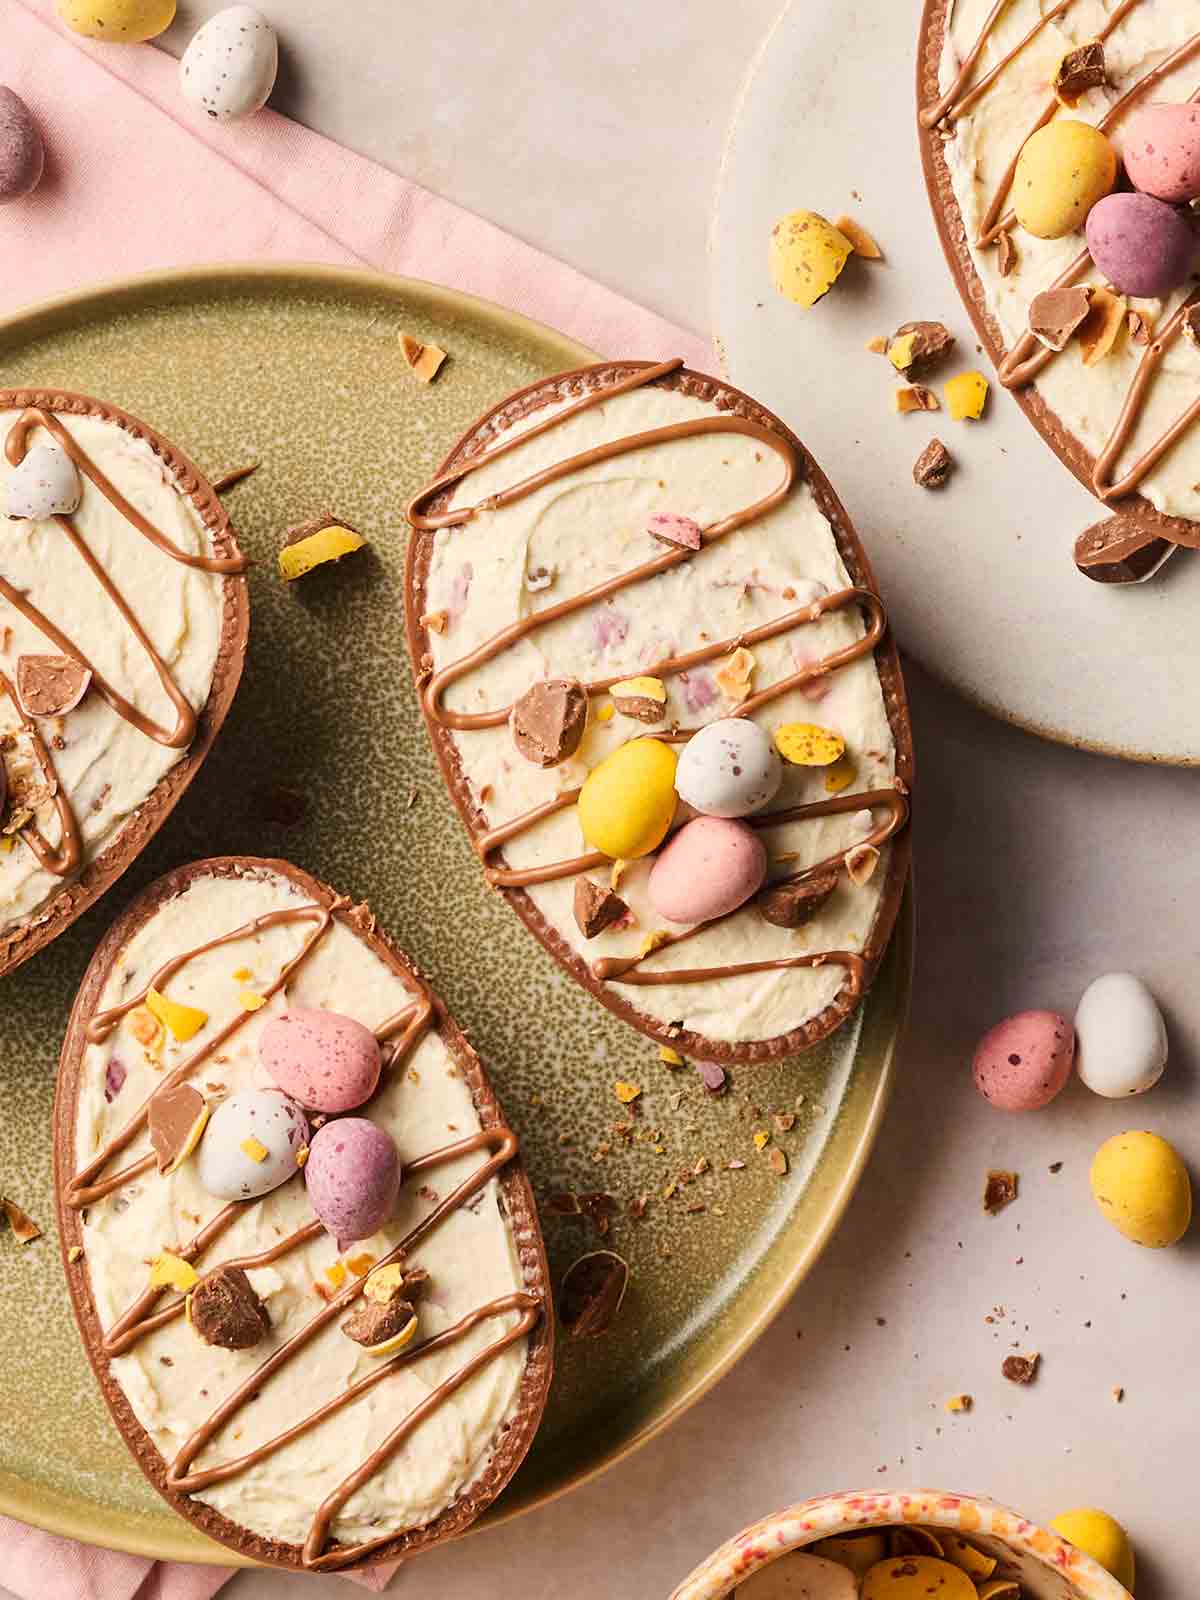
These Easter Egg Cheesecakes are so fun to serve up at Easter. All the creamy filling and crunchy biscuit base of a regular no-bake cheesecake, but with an extra chocolate layer plus they’re really quick and easy too!
Easter for me is about the joy of cooking and baking, and sharing food with loved ones.
There are always a few uneaten Easter eggs kicking around, such is the overindulgence at this time of year, so I thought what better way to use them up than with a fun, cute and inventive dessert?!
Follow this step-by-step Easter Egg Cheesecake recipe with a few tips and tricks to making sure you get perfect puds.
Why you’ll love this Easter Egg Cheesecake recipe
⭐️ Easy no-bake Easter dessert
⭐️ Make in advance for convenience
⭐️ Customisable topping and filling
Sarah’s Notes
We all know about the original Mini Egg Cheesecake – these are their baby brothers!
These Easter Egg Cheesecakes are always a huge hit with the kids especially, and I love how easy they are to make – no baking and less faff than the regular cheesecakes.
We’re whipping up the cream like normal, but they’re a bit more slap-dash, and we don’t have to worry too much about their consistency because they’re held in their very own moulds of an Easter egg!
Just take care when splitting the Easter eggs though – there are tips below for this, which I needed to work on as I cracked a fair few in the testing phase (luckily no broken bits went to waste, of course…)
Easter Egg Cheesecake Ingredients
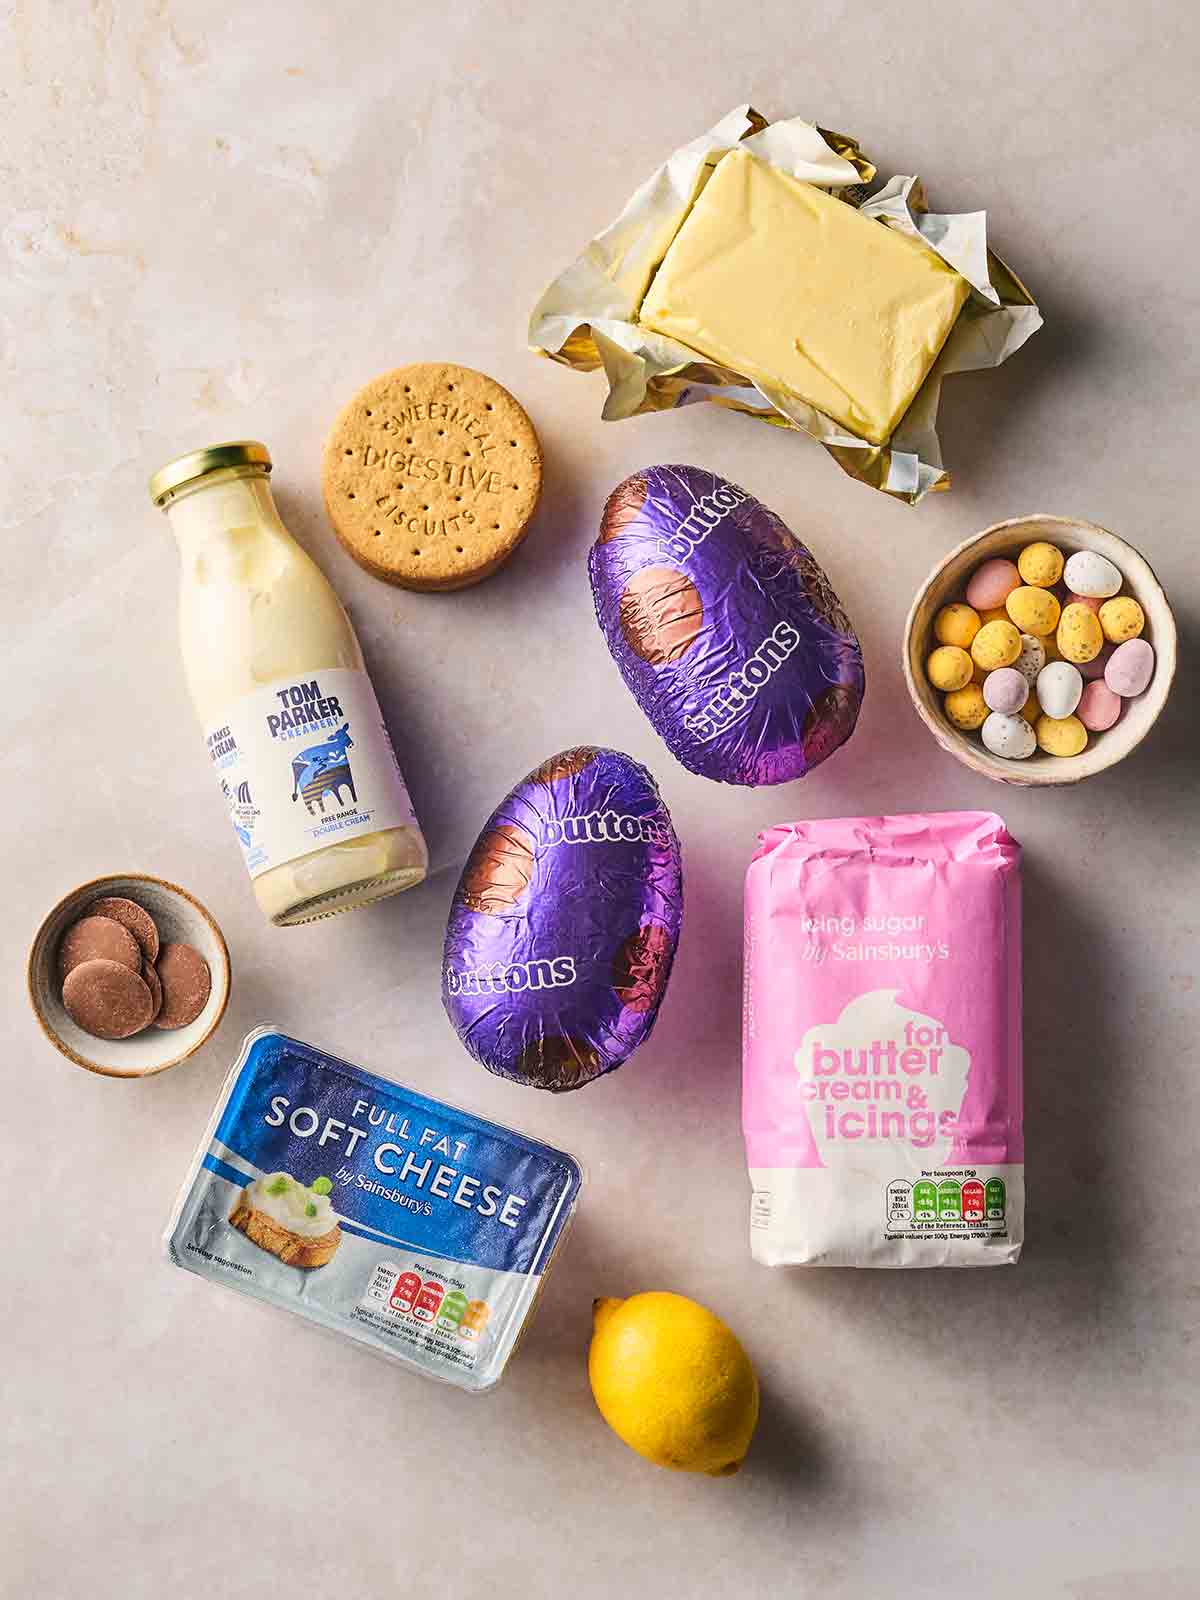
- Easter eggs – For this recipe, I use 2 Dairy Milk Easter eggs, which weigh 90g each. They come with a few chocolate buttons inside, which I melt for the topping before serving.
- Biscuits – I used 4 digestive biscuits. You could use another type of ginger biscuit or graham crackers if you’re not in the UK.
- Unsalted butter – Melt this quickly in a mug in the microwave.
- Double cream – See tips below on the required whipping consistency. This is also called ‘heavy cream’ or ‘whipping cream’ outside of the UK.
- Icing sugar – This fine sugar disappears nicely into the creamy filling.
- Cream cheese – I like to use Philadelphia. You can use other brands but I find they are slightly more difficult to combine. Always use full fat and drain before use.
- Lemon – Just a teaspoon of juice.
- Cadbury’s Mini Eggs – These will need roughly chopping.
- For decorating – Extra chocolate (use the buttons from inside the egg if you have them) and about 20 mini eggs.
How to make Easter Egg Cheesecakes

1. Carefully halve the Easter eggs with a hot, dry sharp knife, as per the full recipe below.

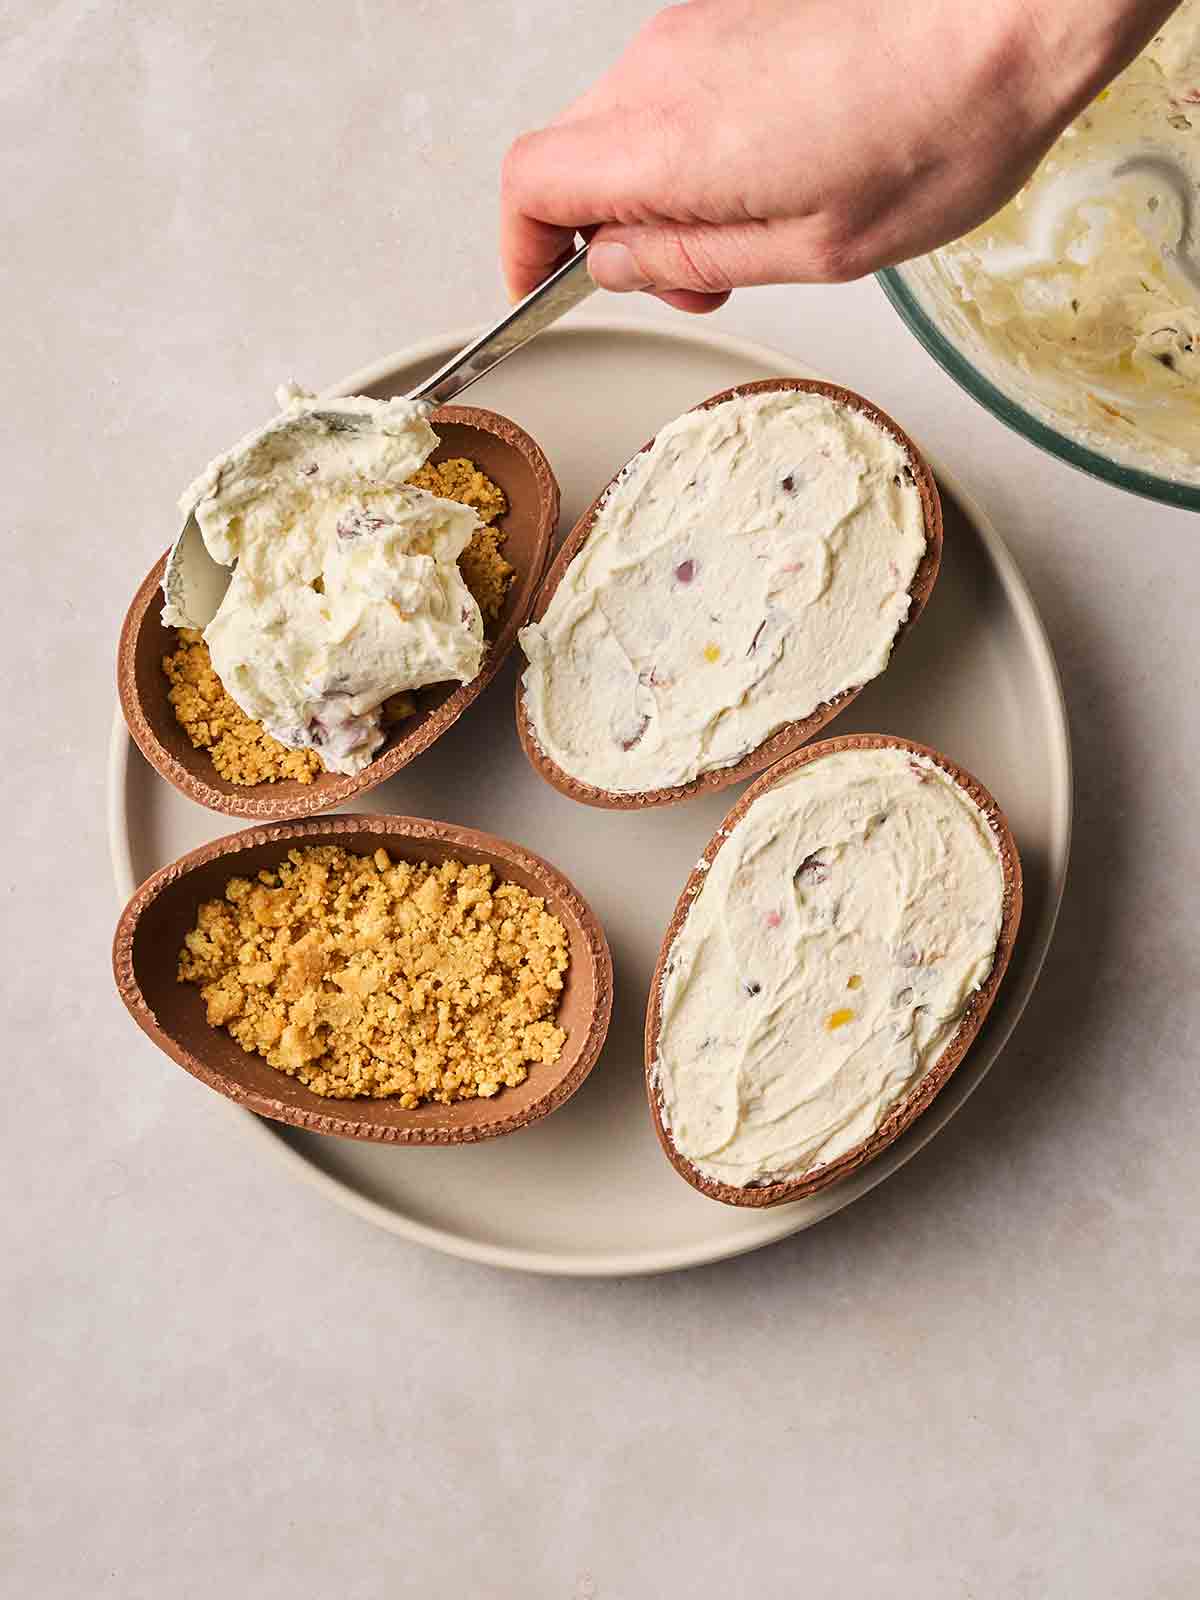
2. Crush the digestive biscuits and stir in the melted butter. Split the mix between the four Easter egg halves and gently pat down with the back of a spoon. Refrigerate.
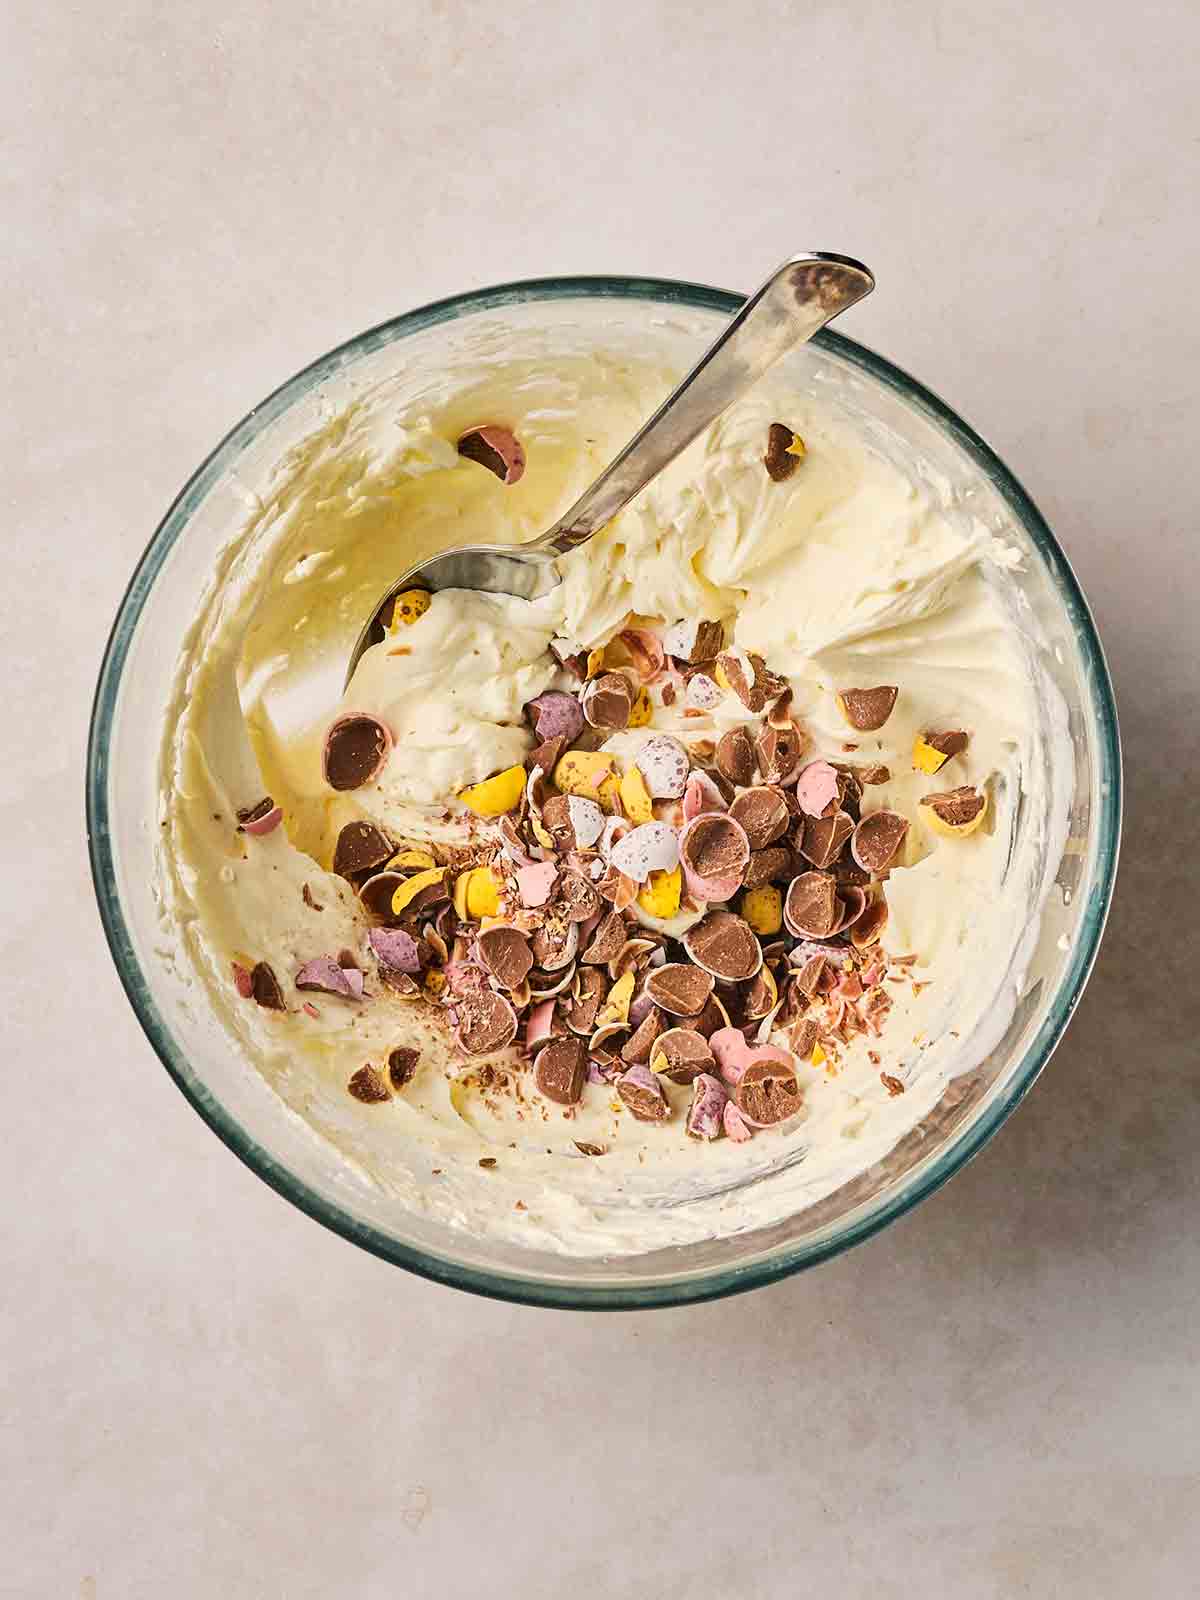
3. Whisk the double cream, then whisk in the icing sugar, cream cheese and lemon juice. Stir in the mini eggs and divide the mix between the Easter egg halves. Chill.
4. Melt the chocolate in the microwave then drizzle over the cheesecakes. Top with the mini eggs and serve.
Storing
You can make these in advance and keep them in the fridge for up to 2 days.
Top Tips
Separating the Easter eggs
Take care when separating the chocolate eggs. I have broken a fair few in the testing phase before working out how to get it open without cracking!
Run a sharp knife under very hot water for a few seconds, then dry it with a towel. Carefully slice the Easter eggs down their natural edge, and hopefully it will gently come apart. If not, keep repeating the process until it’s in two pieces.
If it’s warm in your kitchen when doing this job, it’s best to pop the eggs in the fridge first for a little while to harden, so they don’t melt in your hands.
Whipping the cream
Whip the cream straight from the fridge (this helps to keep it stable) and whip it enough so it’s just forming soft floppy peaks, but still hold its shape.
Too runny and the cheesecakes will be sloppy, too stiff and too dense. Use an electric whisk if you have one.
Easter eggs
You can use any kind of chocolate egg, but please note the amount of filling is designed to make enough for 90g Dairy Milk eggs, so you may have some left over if you use something smaller, or not quite enough to fill it if it’s bigger.
Setting the cheesecakes
Make sure you set these for at least an hour – these don’t need quite as long as a traditional cheesecake, but do give them a decent amount of time in the fridge.
How to crush the biscuit base
I use a food processor because it helps get that nice, fine consistency, but you can easily do it by hand too. Simply put the biscuits in a food bag, seal the top, then bash with a rolling pin or something fairly heavy to get the fine crumble.
More Easter dessert recipes…
Easter Ideas
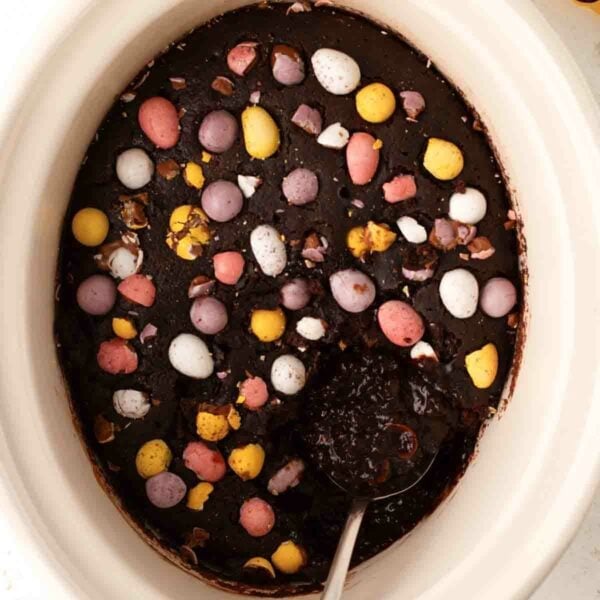
Mini Egg CHOCOLATE Pudding {Slow Cooker Recipe}
Sweet Things
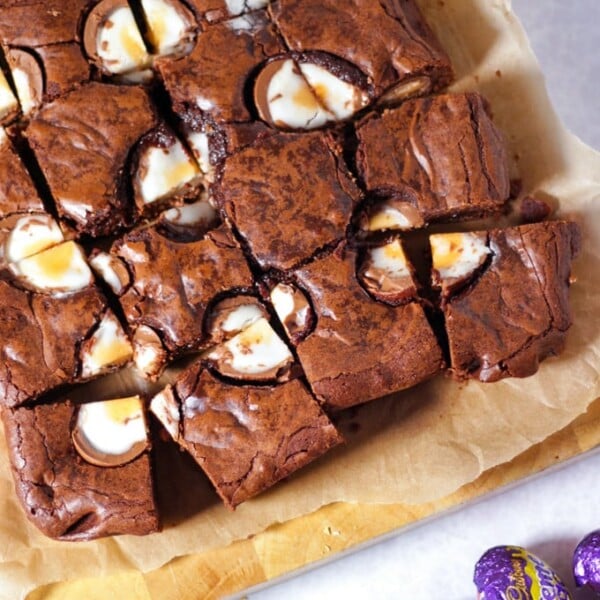
Perfect Creme Egg Brownies

Easter Ideas
Easter Nests
FAQs
Yes. Simply use gluten free biscuits instead of standard ones. Always check the labels of the rest of your ingredients too to double check they’re also gluten free.
Sure, go for whatever you like! This is customisable, simply remove the mini eggs and replace them with other treats.
Let me know how you got on and what you thought of these recipes. Please rate the recipe using the ⭐️ below.
Also I’d LOVE to see your cooking creations. If you’d like to share yours with me, you can tag me on Instagram (@tamingtwins).
Easter Egg Cheesecake Recipe {No Bake}
Ingredients
- 2 Dairy Milk Easter eggs, See notes
- 4 Digestive biscuits
- 30 g (1 oz) Unsalted butter, Melted
- 150 ml (2/3 cup) Double cream
- 30 g (1 oz) Icing sugar
- 90 g (3 oz) Full fat cream cheese
- 1 tsp Lemon juice
- 90 g (3 oz) Cadbury's Mini Eggs, Chopped
For decoration:
- 30 g (1 oz) Milk chocolate, Use the buttons from inside the egg if you have them.
- 20 Cadbury's Mini Eggs
Instructions
- Carefully halve the easter eggs with a hot, dry sharp knife. (Run it under very hot water for a few seconds then wipe it dry). Do this very carefully to avoid it cracking. Leave the Easter egg halves on a plate to one side.
- Crush the digestive biscuits in a small bowl and stir in the melted butter. Split the mix between the four Easter egg halves and very gently pat down with the back of a spoon. Place in the fridge.
- Whisk the double cream until it has stiff peaks, then whisk in the icing sugar, cream cheese and lemon juice.
- Stir in the chopped mini eggs and divide the mix between the Easter egg halves, then smooth out the top. Chill in the fridge for at least 1 hour.
- Melt the milk chocolate in the microwave in a few second blasts then drizzle over the cheesecakes. Top with the mini eggs and serve.
Did you make this recipe? Click here to let us know how it went and give it a ⭐️ rating! Your feedback helps us to make more recipes you really want.
Notes
Nutrition
Nutrition information is automatically calculated, so should only be used as an approximation. Nutritional values are per portion unless otherwise stated.


wow, absolutley incredible
Love the look of this. Definitely on my Easter list!